The Best Upsampling Software in 2021
When it comes to printing, one of the biggest challenges is preparing your images. This step is crucial and shouldn’t be ignored, because the entire look of the final product depends on it.
In addition to resolution, file format, color profile, and ratios, you’ll need to consider enlarging your images. There are many reasons why you’d want to enlarge an image. Perhaps you want to create a large metal print from one of your photos to decorate your home. Or maybe you took a low-resolution photo using your phone and now you need to scale it up. In any case, there’s a right way of enlarging your images and a wrong way.
In this article, we’re going to explore the concept of upsampling and the best tools you can use to turn your photos into high-quality prints.
Resizing and Resampling
The two terms are often interchanged and used incorrectly. Resizing and resampling are two different techniques, and each one of them has its place in post-processing.
Resizing refers to changing the print size of an image while maintaining the same number of pixels. It doesn’t add any new data to the image. If you change the pixel count in an image, then what you’re doing is known as resampling. Both methods will change the size of the image but in different ways and for different purposes.
We see many customers using a resizing tool when they should be using resampling instead. For example, in Photoshop you have the Image Size option where you specify the size of your image by changing the width and height parameters. If the “Resample Image” option is disabled and you double the dimensions of the image, the resolution (measured in pixels per inch or PPI for short) will be automatically reduced from 300 PPI to 150 PPI. The image will be larger, but the resolution might be too low to print the finer details. It all depends on your image and the purpose of the print. Sometimes 150 PPI is just fine and you won’t notice any difference.
That being said, it’s generally not recommended to enlarge an image by resizing it. The resizing method will maintain the number of pixels and only change the size at which the image will be printed.
The solution is upsampling.
What is Upsampling?
Upsampling is an image-enlarging process that relies on various algorithms to limit the loss of quality through interpolation. Interpolation works by using existing information to estimate new values in unknown points and approximate pixels based on neighboring pixels. In other words, when a photo is upsampled, more pixels are added to the resolution to fill in the gaps with accurate values. This method can produce a highly accurate result and in many cases, it’s difficult to tell the difference between an upsampled image and the original if done properly.

As you can see in this basic visual representation of upsampling using nearest-neighbor interpolation, the two images are similar or even identical. There are other interpolation algorithms we can use and results may be better or worse, depending on the image. When you upsample your images, you should try bilinear, bicubic, and any other available interpolation algorithms to see which one yields the best results. In addition, you can use AI-driven software, but we’ll discuss that later. In most cases, you won’t be able to tell the difference between these methods unless you thoroughly examine the details at close range. So, if your print is meant to be viewed from a distance, the interpolation algorithm might not even matter.
Nonetheless, upsampling has some limitations. Algorithms have advanced a lot over the years, and new tools like Gigapixel AI can produce amazing results, but you can’t always enlarge an image as much as you’d like. Upsampling degrades the quality of the image if too much data is added, making it inadequate for a large print. If your image is low-quality, upsampling can improve it but only marginally. For example, you can’t take a 72 PPI image and blow it up to 300 PPI. The upsampling is too drastic and it’s likely to ruin the image. However, for metal printing you don’t even need to go that far.
Many people believe that 300 PPI is required to get a good print. That is only true when it comes to laser printing and is not valid for dye sublimation printing. The ideal resolution for a high-quality metal print is between 120 and 180 PPI. A maximum of 180 PPI is enough to see even the finest of details. Anything more than that is essentially wasted because the improvements are marginal at best.
For optimal results, you should resample in small increments. If the original image is at 150 PPI, upsample it to 200 PPI, check the amount of degradation, and repeat if possible. You can continue upsampling until you find the sweet spot where the degradation is unnoticeable or can be fixed with sharpening and other post-processing techniques. Don’t enlarge your images like in the following example.
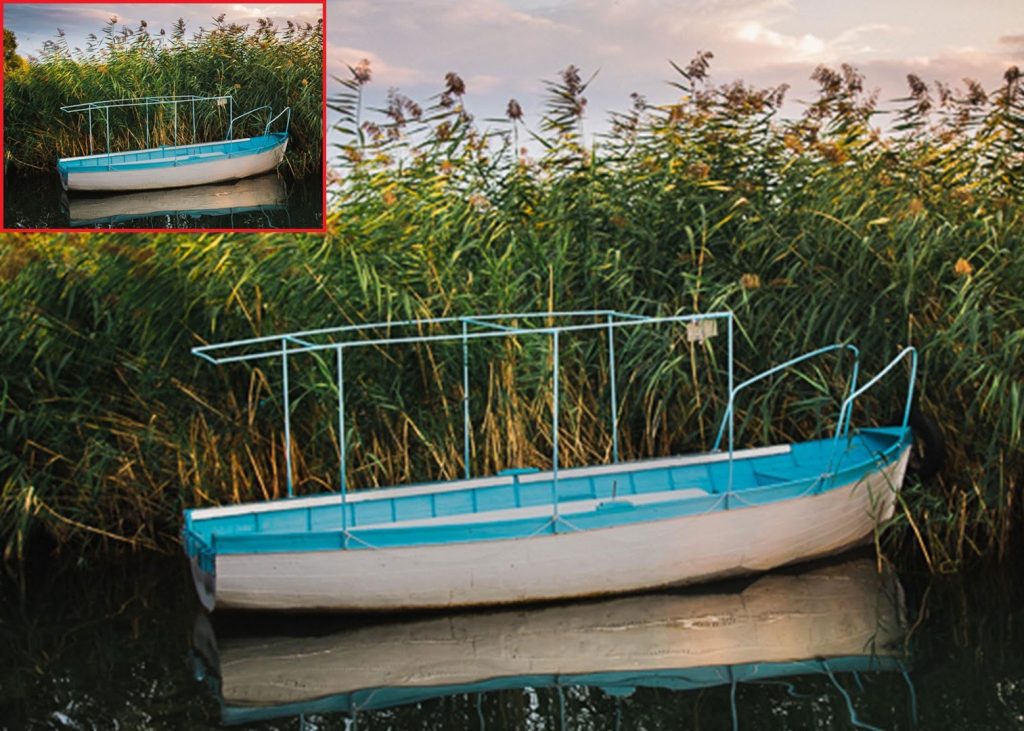
In the image above, you can see an extreme case of upsampling. The original image is small but sharp and highly detailed. In comparison, the upsampled version became fuzzy and has degraded so much that it lost a lot of its detail and sharpness, specifically in the background. The lesson here is that upsampling can only do so much for your images. If you start with a bad image, upsampling won’t make it any better. So, make sure you start out with an adequate image that can be enlarged within reason. A high-resolution photo taken with a professional DSLR can be upsampled without much damage compared to a low-resolution image taken with a cheap smartphone.
Upsampling with Photoshop
Enlarging an image in Photoshop can be a hit or miss process. Photoshop relies on interpolation algorithms to approximate the new pixels and blend them with the original ones. As a result, an upsampled image sometimes looks soft, fuzzy, or oversharpened and it requires further post-processing.
At least, that was mostly true until the release of Photoshop CC 2018 that introduced a new upsampling algorithm called “Preserve Details 2.0.” This algorithm is far more advanced than what we have in older versions like CS6.
To show you the difference between these upsampling algorithms, we’re going to take an image and increase its size by 400%.
To get started, navigate to the Image Menu and select the Image Size dialog box.
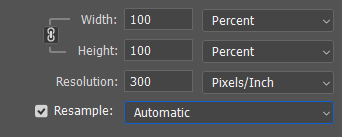
Make sure Resample is enabled, otherwise you will simply resize the image. Next, change the values in the Width and Height fields. In the example above, we chose percentage as the measurement unit, but you can also choose inches or pixels. Take note that by default the width and height are linked together so you only need to change one of the values.
Depending on the version of Photoshop, you should have the following upsampling options: bicubic smoother, bilinear, nearest neighbor, preserve details, and preserve details 2.0.
A Side-by-Side Comparison of Photoshop’s Upsampling Techniques
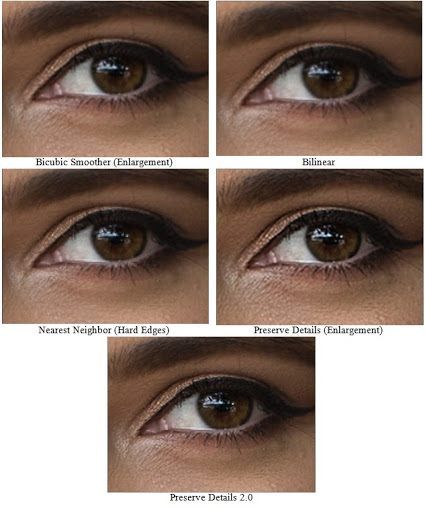
Keep in mind that the original image was upscaled by 400%, which is extreme and rarely done in real situations. Nonetheless, it is quite obvious that we obtained impressive results from the Preserve Details 2.0 algorithm despite not using any kind of post-processing. None of the other resampling methods can match the same level of clarity and sharpness.
If you look at Bicubic Smoother (top-left), it did a passable job. As the name suggests, it smooths out the entire image and makes it a lot softer and less detailed. This can be corrected to some degree by sharpening the resulting image. If you don’t need to enlarge an image drastically, bicubic smoother is a good option. On a side note, this upsampling technique used to be the best one back when we all used Photoshop CS6, but now we have better solutions.
Bilinear interpolation (top-right) produced a somewhat similar result as bicubic smoother, but worse. The image lacks focus and detail. This method should be avoided because it usually produces mediocre results.
Nearest Neighbour (center-left) on the other hand can have its uses, but rarely when it comes to creating quality prints. This algorithm often ruins the details in complex images by adding hard edges and making pixels stick out. It’s great if you need to enlarge screenshots, but there are better options for print.
Preserve Details (center-right), which was introduced with Photoshop CC, is the opposite of bicubic smoother. It focuses on the details and sharpens them. In fact, the entire image looks oversharpened, particularly the texture of the skin. This is something that can be fixed in post-processing, however, Preserve Details doesn’t work well on textured surfaces like human skin.
Preserve Details 2.0 (bottom) wins this comparison by a long shot. Unlike the other methods, this one relies on machine learning AI to find and sharpen the details without oversharpening the entire image. If you look at the subject’s eye, you will see that it’s sharp, almost as if the original photo was taken at this resolution. On the other hand, that level of sharpening doesn’t extend to the skin texture. Despite the extreme amount of upscaling we applied to the image, Preserve Details 2.0 yields amazing results, especially if you apply some additional denoising and fine-tune the sharpening.
Upsampling with Topaz Gigapixel AI
A powerful alternative to Photoshop is Gigapixel AI. This tool uses artificial intelligence instead of interpolation algorithms to enlarge images with minimal degradation. According to Topaz Labs, Gigapixel can be used to upsample images by up to 600% without losing quality. This may sound too good to be true, but it actually handles extreme upscaling surprisingly well. Convince yourself by running a few tests using the trial period offered by Topaz, or check the comparisons below.
![]()
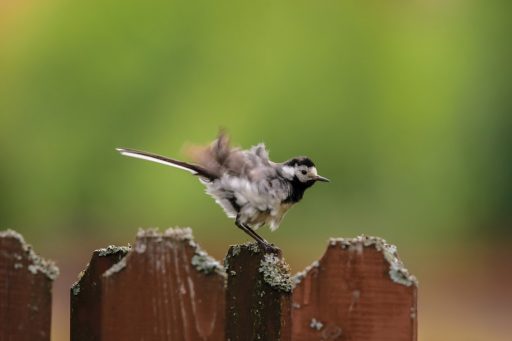
Above, we have a close-up of the original photo (left) and the 2X upscaled version (right). In this case, Gigapixel does more than just doubling the size of the image. It also reduces some of the noise and blur automatically. That’s why, when zoomed in, the upsampled photo looks even better than the original, despite being resampled. A lot of the noticeable noise in the background has been removed and the subject looks much sharper.
Gigapixel AI performs a series of post-processing steps during the upsampling process. While in Photoshop we have to denoise and sharpen the enlarged images to remove some of the damage caused by interpolation, Gigapixel does all that for us. Let’s take a look at another comparison, this time between the full-size original and a 4X upsampled version.
![]()
Original 2048 x 1365 px
![]()
4X Upsampled
Can you spot the difference? Neither can we because there’s barely any. Gigapixel does a fantastic job rendering large prints. That’s all thanks to a few features.
Topaz Gigapixel AI Features
Gigapixel AI is a plug-and-play kind of tool. All you need to do is drop in your image, select the resampling size, and wait for the magic to happen. However, there’s a lot more to it than that.
Continuous Lines
The problem with most photo editors is that they tend to break the continuous lines that are present in each image. This is one of the reasons why an image loses some of its detail when upsampled in Photoshop. Fortunately, Gigapixel maintains those lines or recreates them when an image is enlarged. That is why the upsampled image looks almost identical to the original.
Adding Sharpness
Nobody wants to look at a blurry photo. The only thing worse than capturing a blurry image would be spending money on a blurry-looking metal print. That is why Gigapixel AI should be included in the photo editing workflow. Sometimes, using a tripod and post-processing by hand isn’t enough to produce a quality upsample. However, as you can see in the comparisons above, Gigapixel AI is an intelligent tool that can sharpen images for you.
Gigapixel comes with four different so-called AI Modes: standard, architectural, compressed, and art. Each mode will tweak the image differently by adding various degrees of sharpening and denoising. It all depends on the type of image you’re working with. For example, standard mode is recommended for all images and it works best in most situations. The other three options are meant for special cases. The architectural mode is used for city-scapes and man-made objects that have sharp edges. Compressed mode is ideal for old photos or low-quality images that contain a lot of noise and lack sharpness. Finally, there’s art mode that works best with digital art and scans. Choose the most appropriate AI mode based on the type of image you’re working on.
Noise Removal
Gigapixel AI enhances the detail and sharpness of an upsampled image by simultaneously applying noise reduction and sharpening. Furthermore, the amount of denoising can be controlled by the user. Gigapixel comes with a “Suppress Noise” slider that allows you to tweak the level of noise that should be removed. Sometimes a bit of noise is desirable, so having this option at our fingertips is helpful.
Upsampling with ON1 Resize
Previously known as Perfect Resize, ON1 Resize is a standalone image enlarging program that also works as a Photoshop or Lightroom plugin. This can be an advantage for those who rely on Lightroom and/or Photoshop to process their images as Resize can easily be integrated into the workflow.
Unlike Gigapixel AI, Resize has a much more complex user interface. It comes with several presets, the ability to crop images, and a variety of post-processing options such as sharpening, film grain, tilling, and gallery wrap. It is a fairly complex tool and can require a lot of fine-tuning to obtain the result you’re looking for.
That being said, Resize has a unique advantage over other image enlarging software – it comes with a collection of common photo lab print sizes to choose from. It provides the user with a list of printer presets for Canon, Epson, and HP, and it includes three setting types for each: matte, resin-coated, and canvas. Combined with the option to create gallery-wrapped edges, ON1 Resize enables you to prepare your prints in the most common formats.
What about upsampling quality? Can it beat Photoshop or Gigapixel AI? You be the judge of that.
Here’s our previous bird image upsampled at 4X its original size using ON1 Resize. It doesn’t look bad at all, but it could still use some work. If you zoom in closely and compare the image to what Gigapixel AI produced, you’ll notice that it’s a bit less sharp and there’s more noise in the background. However, that’s because the original photo suffers from the same problems if you inspect it up close.
In the end, Resize quadrupled the size of the image without lowering its original quality. This means that if you upsample a high-quality image you will receive a high-quality image at the end of the process. The opposite is just as true: garbage in, garbage out. Gigapixel AI takes it a step further by making a number of corrections for us, improving the existing data in addition to upsampling. So, it would be unfair to judge ON1 Resize based on that criteria. Resize is meant to be used together with Photoshop or Lightroom where we can make further corrections.
Photoshop vs. Gigapixel vs. ON1 Resize
Each program can upsample an image well enough to obtain a high-quality metal print at a resolution between 120 and 180 PPI. The differences between Photoshop, Gigapixel AI, and Resize are in the detail and they also depend on your workflow. As you can see in our previous examples, resampled full-size images look quite well no matter the tool you use, although in the case of Photoshop you should also apply some denoising and sharpening to minimize deterioration. Nonetheless, when you upsample an image, you want to retain as much detail as possible, especially if you’re working at 120 PPI or less. To find the best tool for the job, you need to zoom in and see the changes that aren’t visible at full size. Let’s perform a side-by-side close-up comparison using all three programs to upsample an image and see which one produces the best result.
![]()
In the above image we have an isolated section of a photo, the way it’s seen at 300% zoom. The clear winner here is Gigapixel AI. Without much effort, we obtained a cleaner and sharper image compared to the results from Photoshop and Resize. Resize produced the second-best image, which can be further improved using Photoshop’s sharpening techniques. Finally, we used Photoshop’s best resampling algorithm, Preserve Details 2.0 (without additional sharpening and denoising), however, it produced a significantly less-detailed result. Compared to the other two samples, a lot more post-processing is needed to improve quality.
Final Thoughts
Upsampling has come a long way since the dark days of Photoshop CS6 and simple interpolation algorithms. If your goal is to turn your image into a large metal print, upsampling might be the right thing to do. Using tools like Gigapixel AI and ON1 Resize in combination with Lightroom and Photoshop can yield impressive results. As you can see in our examples, you can produce high-quality prints by upsampling without going above a 180 PPI resolution. All you need is a good photo and the right tool for the job.


