Soft Proofing Guide and Best Practices Created: Jun 10, 2024
What is Soft Proofing?
Soft proofing is the process of viewing your image in a simulation that will show you if your colors will be within the gamut of that particular printer. The misconception is that by soft-proofing, you will see exactly how your print will turn out, and the print you will receive will look exactly like the photo shows in the soft proofing simulation. This is not entirely correct, and to go further into this, it's a good idea to read our guide on why your prints do not match your monitor.
The most common mistake we see customers make is that they are trying to calibrate their monitor that cannot be calibrated. We sometimes also see customers who buy an expensive photo proofing monitor but assume it comes calibrated out of the box. To get the most out of soft proofing, investing in a proofing monitor along with a hardware calibration device is necessary. Soft proofing can be done on standard monitors but is only limited to accessing if your photo is out of gamut.
What is a color gamut?
The color gamut is simply the range of color a particular space can show. sRGB is the most widely used color space because of its highly compatible spectrum of colors that most monitors, phones, tablets, and many printers can achieve. Many printers can go into the adobe1998 color space, depending on what substrate is being used. It is a good idea to soft proof first to make sure your printer can support the colors found in your file. If a color is out of gamut, the end result will produce a print that looks faded or dull in comparison to what you see on your calibrated monitor. Every printer and its affiliated color profile will have its own range of color that it supports. By soft proofing, you are seeing if your colors are within the acceptable range of that printer.
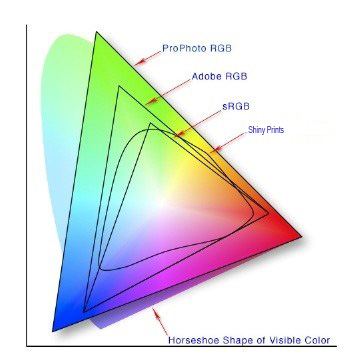
Many input devices like digital cameras and scanners have the ability to capture color gamuts that are larger than Adobe1998 and SRGB. You will have to choose a profile such as Adobe 1998, SRGB, U.S. Web Coated (SWOP) v2, or a Printer profile that you want to output to. Your image editing software or printer software will have to compress the larger gamut (or amount of color) into a smaller gamut space that can cause your colors to shift. Soft proofing can help you make the necessary adjustments so you may compensate.
Understanding the limits of soft proofing
Soft proofing is an important tool while understanding its limitations and can be confusing the many people doing it for the first time. Even a properly calibrated monitor looks very rich and the images pop off the monitor compared to a print. Prints almost always look slightly duller and less "contrasty" than they do on a monitor. The biggest reason for this is that almost all paper or material that is printed on is not a backlit bright white which your monitor can show. Also, monitors can show darker and richer blacks than most printing processes can achieve. This makes your print seem like it has less contrast. Your brain compensates for this when you walk around, but when you compare it directly to the monitor you notice. Soft proofing tries to simulate the difference of the material you're printing on and show it on the monitor. Many people put their image into profile view and see it lose some of its rich colors. This can be unsettling because they see an immediate change that seems like it's for the worse compared to their bright contrasty monitor. Your brain does not have a chance to compensate for this change and many users can end up disappointed.
Make sure you give yourself time to adjust. Remember, when you print out your image and see it by itself, your brain will see those black and white areas in the correct way. It's very important to understand that if your monitor is not correctly calibrated then soft-proofing will not help you at all. It may even make it worse. Please refer to this article to get more information on calibrating your monitor.
Other things to consider about soft proofing that confuses people are the limitations they experience when adjusting their files with different tools like levels, curves, saturation and more. If you're in a large color space, you can add a lot of saturation or contrast with these tools. When you enable soft-proofing, the software will simulate the limitations of that printer's profile. This will make a tool like levels limiting the amount of contrast you can or can't add based on the substrate you're simulating. You will find you can't make your highlights and shadows quite as punchy as you could before you were in the profile. Also adding saturation in most cases is limited. Below you will see the Levels tool opened on the same image. The first one is in the larger Adobe 1998 profile. The second one is in Printer profile view. You can see the differences in the histogram. This shows less information in the darkest and lightest areas of the image. This can be very frustrating to someone who is not familiar with soft proofing. This is because limits on adding the contrast and saturation they're used to seeing on the monitor. Many times, if someone is frustrated with this process, I recommend they take it out of the printer profile, make the adjustments they are comfortable with, and get a hard proof (proof that is printed out). Most of the time they are happy with the results because their brain has compensated for the changes.
When you soft proof your image with the printers ICC profile, it is very important to understand that what you are making sure of is that your colors are not out of gamut. When viewing the simulated soft proofing conditions, you are looking to see if any colors are shifting. If you see some colors shift, it likely means you are slightly out of gamut and may be using a color profile that is not supported by that printer. sRGB is the safe bet and is the most compatible color space in the printing industry, but some customers want to push further into the Adobe 1998 color space which offers a larger gamut. Soft proofing should always be done when using a color space that is larger than sRGB (adobe1998, pro photo). If you are soft proofing on a non-calibrated monitor, do not expect your file to look like how it appears on your screen. In fact, it is not recommended to soft proof on a non-calibrated display because the colors you are seeing on your monitor likely are not the actual colors that are in your print file.
Can Metal Prints be Soft Proofed?
Almost any printing process can be soft proofed. It all comes down to whether that particular lab is willing to share their ICC profile to allow their customers to soft proof. Many labs are protective over their profiles and do not want their competition to get their hands on them. This is sometimes an unnecessary precaution because color profiles are usually created with that lab's exact combination of ink, paper and pressing times. Printers shift and should be calibrated at least once a year. It is important to understand that your image on your display will look different than the metal print you receive, which is true for any printing medium.
Metal prints use the dye sublimation process which means the ink transfers from paper to the coating on the aluminum panel. When that transfer happens, the ink droplets turn into a gaseous form and when it infuses into the coating, the droplets expand slightly. This results in a bit of softness that can be seen on smaller prints. This is exactly why metal prints work best for larger prints where the softness from the ink expansion benefits the print by hiding resolution limitations and other flaws.
How do I soft-proof for Shiny Prints?
Soft-proofing in Photoshop:
- Step 1. Download our color profile here. Install it on your device by right-clicking it and selecting "install profile" on Windows, on Mac, you will need to place the file into your profiles folder.
- Step 2. Open your image and make sure there is an assigned color space.
- Step 3. In the top menu bar, click on "View" > "Proof Setup" > "Custom"

- Step 4. At this point, you will see a dialog box with different options. From the "Custom Proof Condition" leave that set to custom.
- Step 5. On the "Device to Simulate" drop-down option is where you will want to select our profile which is F60 Unisub MP v4a. This may appear slightly different, so just make sure it has Unisub in the name.
- Step 6. Set Rendering Intent to "Perceptual"
- Step 7. Make sure the "Black Point Compensation" checkbox is checked.
- Step 8. Check the "Simulate Paper Color" checkbox.
- Step 9. Click the "Preview" option to toggle back and forth to check for any color shifting.
Final Thoughts on Soft Proofing
Soft proofing can be very useful as long as it is not the only tool being used to prepare your files for printing. Like any printing process, getting familiar with your lab and/or printing medium will give you a feel over time on just how your prints will turn out. Getting hard proofs is the only sure-fire way to know how your prints will turn out. If you're serious about accuracy, talk to your lab about getting hard proofs and ask them about their process to get a better understanding of what is likely to happen to your file once it is put into their production process.

