
A comprehensive photography guide for beginners
Photography isn’t very easy to pick up, especially when you’re diving into it without any experience beforehand. Cameras can be frustrating tools that won’t cooperate, but with enough time and knowledge, most people, especially beginners, can become fairly adept at using any type of camera for virtually any situation.
Personally, I didn’t really do well with cameras either. My only experience with cameras before using a DSLR when I was 15 was with a film camera that I could barely operate and small point and shoots. My first pictures included not so artistic pictures of nails, the edge of a sofa cushion and a spider scurrying about on a dimly lit wall. I had absolutely no idea what I was doing and the pictures showed. After reading up on photography and going through works of photographers, I slowly began to understand how to take good pictures and developed my own style. By understanding how your camera works, learning to operate it and understanding a few basic concepts, you can go from a complete novice pointing at things and hoping you get a good shot to a budding photographer who takes photos with intent and purpose!
The Big Three – Aperture, Shutter Speed and ISO
Understanding how these three functions in your camera work are critical to taking pictures, especially in manual mode (which will be covered later). Aperture, shutter speed and ISO are very closely linked, and using one of them in a certain way is bound to affect the other two.
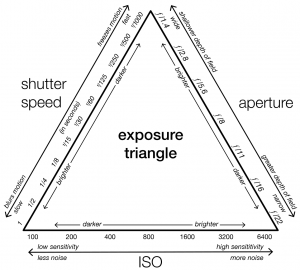
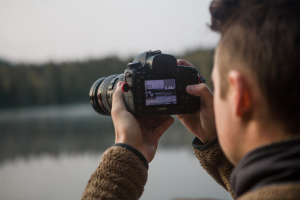
Aperture is the opening of your lens that decides how much light can enter it. The larger the opening, the larger the amount of light entering the lens. A larger aperture is usually denoted by a small number. For example, if the aperture of your lens is set at f1.8, it means that the opening of your camera is large, which will let more light in.
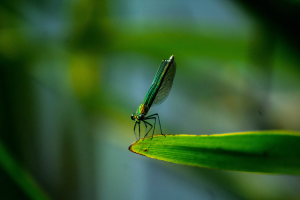 A larger aperture leads to a shallow depth of field
Letting more light in also means a shallow depth of field. This basically means that the background has a blurry effect to it. A great depth of field would lead to everything in focus. Portraits of people and photos of wildlife and moving objects usually require a shallow dept
h of field, while landscape photos typically require a great depth of field.
Shutter Speed
The shutter speed of a camera denotes how quickly the lens opens and closes to capture the image. A faster shutter speed means that less light comes in through the lens and is usually used to capture and portray images as frozen and still, i.e a moving object looks stationary, while slower shutter speeds mean more light coming in through the lens and pictures looking like they’re in motion, though this isn’t always true. Slower shutter speeds (slower than 1/30th of a second in most cases) usually lead to blurry pictures, since even a tiny shake can cause a shift in the way the light is entering the lens, thereby causing the picture to be out of focus.
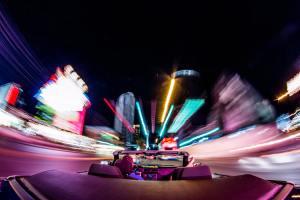
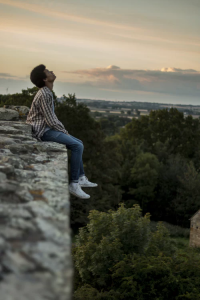
Slower shutter speeds allow us to capture moving images in their essence
Slower shutter speeds are usually used in capturing motion blurs (like moving cars) and stills of the night sky filled with stars, while faster shutter speeds are more commonly used in our everyday photography to capture people, objects and landscapes.
ISO
The ISO helps in increasing or decreasing the brightness of a photo. Indicated by a simple ascending order of numbers (100, 200, 400 etc) and a digital rendering of additional light, the ISO is usually used when both the shutter speed and aperture haven’t succeeded in getting in enough light, but can also be used to change the way a picture looks. After a certain threshold, a high ISO leads to an increase in noise (grain) in the picture. Some photographers use this grain to enhance the look and feel of their images.
White balance
White Balance is an underrated aspect of the camera that many people tend to brush over, mostly since any imbalance can be “fixed in post”.
So why care about white balance? The white balance setting helps set the colour tone of the picture, with a yellow-ish background needing “cooler” temperatures, between 3000k to 5500k (example: golden hour shots), while blue-ish tints in photos require a “warmer” white balance, around 6500k to 9500k.
While the camera’s stock auto white balance mode can be useful sometimes, they’re inaccurate and inconsistent to use. To test this out, apply the tungsten light setting when shooting indoors. The colours will be neutral or blue, changing the entire tone of the image.
It’s therefore very important to have an understanding of how to use the white balance setting of your camera. While using custom white balance settings can be tedious, it’s beneficial in the long run as you learn just exactly what setting to keep the camera at regardless of how the lighting or exposure changes.
Metering Modes
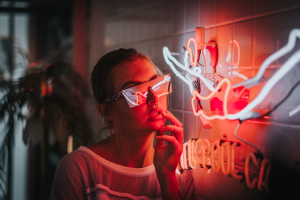
DSLRs come with so many features these days that we don’t look into all of them. Metering was something I unconsciously did without knowing what it was until a photographer told me about it. Basically, metering is a way for the camera (and you) to evaluate what the correct amount of exposure is for your shot. The camera usually does this by tweaking the aperture and shutter speed. However, there’s also some software magic that’s applied here, which is done by what’s known as “evaluative metering”. Here, the frame is split into several different matrixes to determine which areas need more light and which areas need less light.
For example, the image below would look very different if the light from the neon sign were to creep into every part of the frame. By using a metering mode, you can isolate the light to the person’s face.
Histogram
Histograms are tricky, not only to read but when it comes to use as well. A histogram allows you to understand where the lighting of your photo is lacking by dividing the frame into a 5-part graph: blacks, shadows, midtones, highlights and whites. If either side is lopsided, it means that there’s something missing in the photo in terms of lighting. At least when it comes to a well and evenly lit scene. When it comes to a dark room with one source of light, it’s obvious that it’ll lead to an uneven histogram.
 Histograms can be helpful but also hit or miss
Histograms can be hit or miss, but they’re a great source of information if you understand the scene you’ve created but need a little extra push and oomph to bring the best out of your picture.
Depth of field
Depth of field is when an object has “girth”, i.e it looks 3D instead of looking flat. The depth of field of an object depends on the lighting conditions and on the aperture (Larger the aperture in terms of size, shallower the depth of field).
The depth of field of an image also becomes shallower if the focal length increases, as it’s more convenient for the camera to focus on a smaller area when the object (or area of focus) is far away. It’s immensely useful when you want to focus on an object or a person and is used especially in portrait photography and moving image based photography like sports and wildlife.
Ideally, photos with depth in landscape pictures isn’t the best idea, as landscapes tend to have tons of things going on at different focal lengths and the idea of a landscape is to show everything in the frame.
Framing
A critical aspect of photography is framing or composing a photo. A great thing about photography is that despite having certain “rules” when it comes to framing, they’re not hard and fast and can be broken and still yield a good photo. Some important rules include the rule of thirds and visual weight.
Rule of thirds
The rule of thirds is where you split the frame into three equal parts, horizontally and vertically. The idea is to not centre your subject and instead place them on a “third” of the photograph, leaving the two-thirds empty to establish empty space and put more emphasis on the subject. It works very well to improve the quality of your pictures, but it’s also easy to overuse it, especially when taking portraits.
Visual Weight
There are several ways to establish visual weight or a point of focus in your photos. The aim is to direct attention to a specific part of your photo. This is usually done by using background props or objects that help put the “weight” in the picture. Visual weight can be large objects, colours, negative space or shapes.
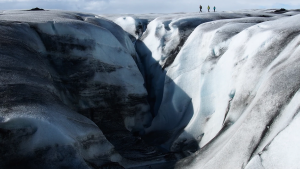
In landscape photography, visual weight is achieved by using scale. For example, while taking a picture of a huge mountain, it’s difficult to understand just how large the mountain actually is. This takes away the “wow” factor of the picture. To help rectify that, most people tend to have a person stand near the mountain in a way that doesn’t distract from the mountain. See below:
Lenses
There’s a saying that quality lenses are more important than an expensive or “impressive” camera. The type of lens and its quality make a huge difference to your photographs. For example, a wide angle lens won’t work well for a portrait of a person. Which is why having a small variety of lenses (at the start) is important. Many cameras have “kit” lenses, the most common being the 18-55mm and the 55-250 for Canon and 18-55 and 70-300mm for Nikon. This is a good start and covers the basics very well.
The Nifty-Fifty is one of the most well known and versatile lenses known in photography, not only in terms of quality but also in terms of use, cost efficiency and availability across different camera types. It’s cheap, it works with many types of photography and is a fantastic first lens to have.
Filters
While not used very often, filters can help in improving the optics of your images. This depends on the type of filter you use, but the most common is the polarizer filter. Polarizers help in darkening sources of light, filtering out excess light for when you need it. That’s not all, with polarizers also being a handy accessory for reducing lens flares and linear polarizers can be used to balance the amount of light in a camera. Cameras and its settings do have limitations, after all, and polarizers are a great way to rectify any lighting bases issues you might have.
You also have neutral density filters, which are very helpful in getting shots with an extended exposure time (usually more than 30 seconds).
UV filters help with the clarity of an image and warming/cooling filters which helps fix any white balance issues you might have with your camera.
Here’s a video by Peter McKinnon explaining different types of filters: video
Lighting
Lighting is dependent on where you’re shooting: indoors makes things a lot trickier than one expects, while outdoors, while straightforward for the most part, can have its own set of problems to tackle. Lighting indoors usually means that you’ll need a filter, since light will be bouncing off of many surfaces, making the photo either overexposed or look muddy and dirty (too yellow/blue). In such cases, using a photo filter will help sort the lighting for your images.
Similarly, using filters for your lenses can help fix any lighting issues you have outdoors. It’s also recommended to shoot when its an hour after sunrise and an hour before sunset. Also known as the golden hour, it’s when fiery flares of sunlight illuminate the sky, giving the surroundings a glow-y, warm embrace. It also enhances how your photos look and give them the extra “oomph” it needs.
Conclusion
Photography can be tricky, frustrating and difficult to pick up, and its most certainly very difficult to master, despite what some people might tell you. But working with the right information, looking at other photographers and learning from them while picking your specialty can work wonders for developing your own style and hitting the right notes. It’s very important to also know that photography comes with practice: no amount of tutorials and guides can help you improve your photography if you don’t even venture out with a camera. Step out and start clicking!


