Lightroom: Quick Post-Processing Guide for Beginners
Lightroom is an image manipulation program designed to help you sort your photos, post-process them, and export them for print or digital use. Lightroom is one of the most popular tools for amateur and professional photographers alike because it’s non-destructive. It is easy to use, and it easy to learn how to use it. You may not be able to do some complex things such as focus stacking, something that Photoshop would allow you to do, but when it comes to editing and post-processing, Lightroom provides you with an efficient workflow.
Lightroom is unique and very different from other post-processing programs out there because the original photo you are working on will remain intact. What does that mean? Every change you make to a photo such as brightness, saturation, and spot removal, will be visible only in Lightroom. If you choose to open the same photo in some other program, it will be as if it just came out of the camera. In other words, Lightroom isn’t destructive.
So, does that mean the photo is useless if you can see the changes only in the Lightroom?
Certainly not! You need to export the photo to be able to see it outside of Lightroom. By exporting, the program will generate a new file without overwriting the original image file. That means that you can always return to the original and try something different.
That being said, Lightroom is the ideal image processing program when it comes to preparing your photos for metal printing. In many ways, it’s simpler than Photoshop and more straightforward. You don’t have to dive in too deep to discover every tool panel you can use to improve your images and you don’t need to worry about overwriting the original photo.
Getting to know Lightroom
Lightroom is not quite as advanced as Photoshop, so it’s not a complete alternative for it, but it offers enough options for you to create stunning photos and professional prints. Ideally, you’ll want to include both Lightroom and Photoshop in your post-processing workflow, but if you’re a beginner who wants to see his work in print Lightroom will do just fine. You can process all of your images in Lightroom, change their brightness, saturation, hue, remove noise, remove specks of dust and other imperfections, and so much more.
To get started, you’ll first enter Lightroom’s editing space, which is called the “Develop” module. There, you will find all of your post-processing sliders and tools.
In the panel named “Basic”, you will find the sliders that control saturation, colors, contrast, and other simple editing tools. Keep in mind that if you just play with the sliders, the changes will be applied to the whole photo. These kinds of edits are referred to as global edits. But that doesn’t mean you can’t apply the same edits in specific parts of the photo. With the correct use of the brush or filters, you will be able to do so many things. But let’s return to the global edits for the moment. They are fairly intuitive and self-explanatory, and there is no need to go into details about them. Half of the learning process in Lightroom is about experimenting. Nevertheless, let’s quickly cover what each of the sliders can do.
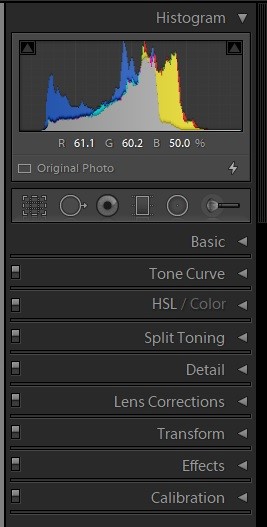
- Treatment: This module lets you choose whether the photo should be in color or black and white.
- White Balance (WB): Using this setting, you can correct the white balance if your camera picked the wrong value. This means that if the image is too cold, or too warm, you can easily correct it. Under the white balance module, you will also have the slider that enables you to adjust the color tint of your photo.
- Tone: The tone module comes with several options and sliders. Here you will be able to adjust exposure, contrast, highlights, shadows, whites, and blacks. These sliders and how you use them will greatly depend on the photo you are working with, and on your personal preference. For example, you might need to bring out more contrast in order to separate the subjects nicely. The sliders under this module will let you correct the photo as well as add your personal artistic touch to it. These options alone will already greatly improve your image.
- Presence: This module allows you to change the clarity, vibrance, and saturation of your photos. However, some newer versions of Lightroom will also include the option to add or remove haze or enhance texture.
The difference between vibrance and saturation is often misunderstood. Vibrance is what makes the colors more or less intense, while saturation actually shifts the colors, often to the extremes. Use these two sliders carefully.
Making local adjustments
As mentioned, these sliders are global adjustments and they will apply any changes to the whole photo. If you wish to edit just certain parts of your photo, you will have to use other tools such as crop overlay, spot removal, red-eye correction, graduated filter, radial filter, and brush. Depending on the version of Lightroom you have, you might have other tools as well, but these six options are the most important ones.
![]()
Crop Overlay will allow you to crop your photo, but also to flip it and straighten it. You can even set your custom aspect ratio using this tool or use one of the presets. Turn on the grid or use your own compositional rules.
Spot Removal is one of the most useful tools in Lightroom. It will allow you to remove the undesired parts of the photo or heal anything that looks damaged or undesirable. It is an amazing tool for removing dust specks, skin blemishes, and other imperfections. There are two options within the spot removal tool: clone and heal. They both work similarly, sourcing the replacement pixels from another part of the photo. However, while the clone option copies the exact pixels, the heal option relies on its algorithm to make those pixels look more natural by blending them in the area you’re trying to fix.
Red-eye Correction is very simple to use. All you need to do is click on the red spot in the subject’s eye, and the program will do the rest. To make sure you click on the right spot, zoom in by pressing Z.
The Graduated Filter is a very creative tool. It will allow you to adjust a part of the photo without influencing the rest of it. Graduated filters will make the transition gradual, which will give the photo a natural feel. With a graduated filter, you will be able to make all the basic adjustments we discussed earlier, such as brightness, contrast, and saturation.
The Radial Filter is similar to the Graduated Filter but the gradient is circular, or oval-shaped. Just as a graduated filter, a radial filter will perform fine adjustments, and with a little manipulation and creativity you can produce amazing results.
The Adjustment Brush is the simplest tool. You should be familiar with it because even if you used MS Paint until now, you worked with a brush. All you need to do is paint over the areas where you want to apply the adjustment. You can set your adjustments before painting or even afterward. If you want to see the area brush effects, just press the key “O”, or click on the “Show Mask Overlay” option in the toolbar.
The Tone Curve
The tone curve is the visual representation of all the tones in your image. There are many things you can achieve by playing with the tone curve and it is a fairly complex topic. However, the most important thing for beginners is to understand what this curve is, and how it works.
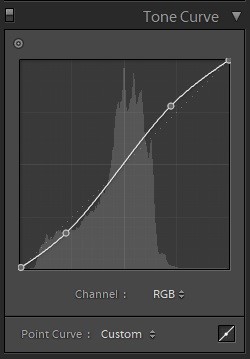
The tone curve is represented by a diagonal line inside a box, and by manipulating this line you can change the shadows, mid-tones, and highlights of your photo. You can either drag the curve itself or pull on the sliders you find under the curve. If you manipulate the bottom part of the curve, you can either raise or drop your shadows, depending on the direction in which you pull. The middle section of the curve manipulates mid-tones, and the highest point adjusts the highlights. The default setting of the tone curve is in RGB (red, green, and blue), but you can select each of these channels and manipulate them separately if you want. Changing individual colors will give you a whole new range of creative possibilities.
That being said, it is easy to mess up your whole photo just by playing with the tone curve. You need to be very careful with it by making small changes. Be gentle with the curve, and avoid pulling it to the extremes. This will completely distort the photo making it look very unnatural. The primary intention behind using the tone curve is to make your image pop.
The easiest and most often used technique is making an S shape out of the curve by dragging the lower third down, and the upper third of up. Again, dragging only a millimeter or two should be enough. The curve itself is very sensitive, so be gentle.
When shaping the curve into an “S” you will lower the shadows and raise the highlights. This will add more contrast to your photo, and the image will simply pop because the colors will also look a bit more saturated. If you desire the very opposite effect for your photo, all you need to do is make a reverse ”S”.
Split Toning
Split Toning is another creative editing option, but most photographers skip it. It enables you to change the color tones of your photos, but separately when it comes to highlights and shadows. This whole panel is just a variation of toning and it will allow you to add a single color to the photo. Split toning is easy to use as it has only five options: highlights hue and saturation, shadow hue and saturation, and balance. Play with these options to see the results you will get. It can sometimes give your images a very otherworldly effect. For example, tinting B&W photographs is a simple process, and the results are pretty straightforward. But split toning color photos will give you much better results than that same tinting effect. This is because split toning will allow you to add warmth to the highlights, and make your shadows look deep and cold.
However, if your intention is to change the tone of both shadows and highlights, it would be more practical to do it in the “basic module” by pulling on color temperature sliders. The split toning option uses a different algorithm than the temperature sliders. Use it only if you need to tone shadows and highlights separately.
Lens Correction
This feature will allow you to fix any issues in your photo that were caused by the lens itself. These can be distortion, chromatic aberration, vignetting, or perspective correction. However, since each lens is designed with a unique optical formula, the same correction cannot be applied to all of your photos, only on those that were taken with the same lens. This means that, for example, the correction from the Nikon 35 mm f/1.45 lens cannot be applied to a photo taken with the Sigma 35 mm f/1.4g lens. They share the same focal length, but they were designed differently. However, with each new Lightroom version, new lens corrections are added.
Applying any lens correction is easy. Simply navigate to the Develop module, click on the Lens Corrections panel, and all you have to do is check the “Enable Profile Corrections” and “Remove Chromatic Aberration” options. These are found under the “Basic” tab, or under the “Profile” tab if you’re using an older version of Lightroom. Newer versions of the program have additional buttons such as “Off”, “Auto”, and “Level.” These are quick ways to level the photos or apply perspective corrections.
Furthermore, under the “Profile” tab you will find the option to set custom corrections depending on the model of your lens, and under the “Color” tab, you can use the sliders to correct chromatic aberrations manually. This is usually used when Lightroom fails to perform the task properly if you chose chromatic aberration correction from the “Basic” tab. The manual tab lets you manually correct distortion and vignetting, especially if the lens you used is not supported by your version of Lightroom.
Sharpening Your Photos in Lightroom
Under the “Detail” panel, you will find the sharpening tool. Unlike in Photoshop, Lightroom’s tool is easy to use, and non-destructive. Lightroom will also allow you more control over the sharpening of your images with some extra sliders you can use to customize it to your liking. Before you start, you should set your photo to 100% view the effect of your sharpening settings.
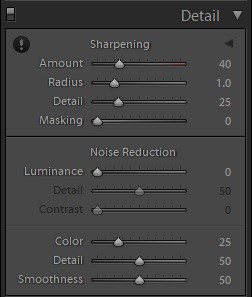
The sharpening tool has four sliders, each giving you control over a different aspect:
- Amount: With this slider, you can manually set the desired amount of sharpening you want to apply to your photo. Zero means no sharpening at all. Keep in mind that the more you increase the amount of sharpening, the more noise will be added to your photo. Try not to use this slider extensively as oversharpening can ruin your photo.
- Radius: This slider will let you control the sharpening area around the edges. The default value is set at 1.0 and it means Lightroom will apply sharpening up to 1 pixel around the edge. If you choose another value, take note that sharpening will add a thicker edge which can result in zigzag lines, thus ruining your photo. The default setting is good enough for most photos, but if you feel you must increase the radius, keep it up to 1.5.
- Detail: The Detail slider tells the software which edges should be sharpened. A high value means that the smaller edges will be sharpened. A low value, such as 0, will sharpen the large edges only. Ideally, you should keep the detail slider under 50 otherwise you will over-sharpen the image and generate more noise.
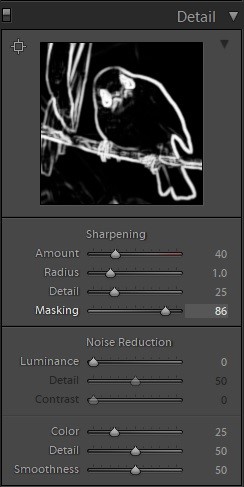
- Masking: This setting will simply mask out the areas that are not to be sharpened. With this tool, you can minimize the impact of the added noise produced by the “Amount” slider. Masking is not that useful for images that have lots of details, but it works the best on photos where you have only one subject that you want to separate from the background.
Hold the Alt key on your Windows PC (or Option on Mac), and the image will change significantly, but you will be able to see the finer details. By moving the masking slider while holding Alt/Opt you can control where sharpening needs to be added. Take a look at the image below to get a better idea of how masking works.
Lightroom Presets
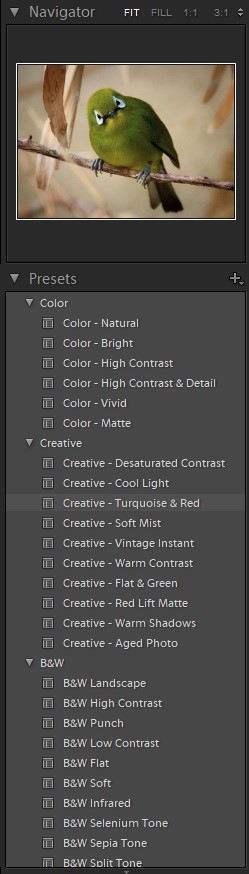
On the left side of the Develop panel, right under the Navigator tab, you will find the Preset tab. Just as the name suggests, presets are pre-determined settings that will be applied to your photo with just one click. Presets are files that put an action in motion by which Lightroom applies particular settings from the “Develop” module to your photo.
Lightroom comes with a number of presets and they are organized in folders depending on the effects you can achieve with them, such as color, creative, B&W, Curve, Grain, Optics, Sharpening, and Vignetting. However, the folders and the effect that come with presets will greatly depend on the version of Lightroom you have. You can preview what any of these presets does to your image just by hovering over them with the cursor.
Lightroom will also allow you to create your own presets, or import the ones made by other photographers. However, to save a custom preset, you need to make changes to an existing photo. Once you are finished applying changes to the photo, click the plus symbol (+) in the header of the Preset panel or navigate to the Develop menu and choose “New Preset.” Keep in mind that any change you applied to your initial photo can be saved in presets. At this point, the preset will work correctly only on the photos that look very similar to the initial one. To fix that, you can opt to exclude the Exposure settings from your preset. This will allow you to make some basic exposure settings on the new photo manually, before applying the preset. You can also create presets for different settings. For example, you can save a curve preset, or split toning preset and see how they work on different images.